Sunday, June 19, 2016

Cup Cozies

For the first project in my Crochet Course we will be making Cup Cozies to practice chains, single crochet and turning. There are a few different styles to choose from.  Here are some examples.


An another one:


And more to come.....


Monday, June 13, 2016

CROCHET CLASSES


I am going to be running "Learn to Crochet" lessons in July, on Saturdays at 10 am to 12 noon, at the Artrageous Art Studio in Westleigh.


My head is buzzing with ideas for how to teach the basic crochet skills, and am designing a small project to complete each week to showcase what you have learned,. So students can feel they are really achieving something every lesson.

By the end I hope all the students will be started and well into a bigger project of their choice - so I'm also busy writing up and searching out some good options.  Over the next few weeks I'll be posting pictures of some of the projects we'll be doing to provide inspiration.

If you'd like to join the class, please ring Artrageous Art on 9875 2813 to make bookings. If you have enquiries for the teacher please email me at megandbel@gmail.com.

For those that haven't heard of the lovely suburb of Westleigh, it is midway between Hornsby and Pennant Hills in Northern Sydney.


Artrageous Art in the Westleigh Shopping Village has been running since 2011 - there is a store which stocks a wide range of art supplies, and a studio space where classes are run. This winter the owner, Debbie, has branched out into yarn and knitting and crochet equipment which makes the store even more difficult for me to walk past without popping in! Debbie is so enthusiastic and friendly and I love the way she is always keen to source and order in items for customers that she may not stock yet (which I'm sure is not just because she gets to play with new things when they come in).

Debbie is an amazing knitter and runs a knitting class (among others), but she can't crochet so thats where I come in.....

Wednesday, September 21, 2011

Making our Butterfly Walls


We started by collecting paper and card in colours that fitted the colour scheme we wanted.
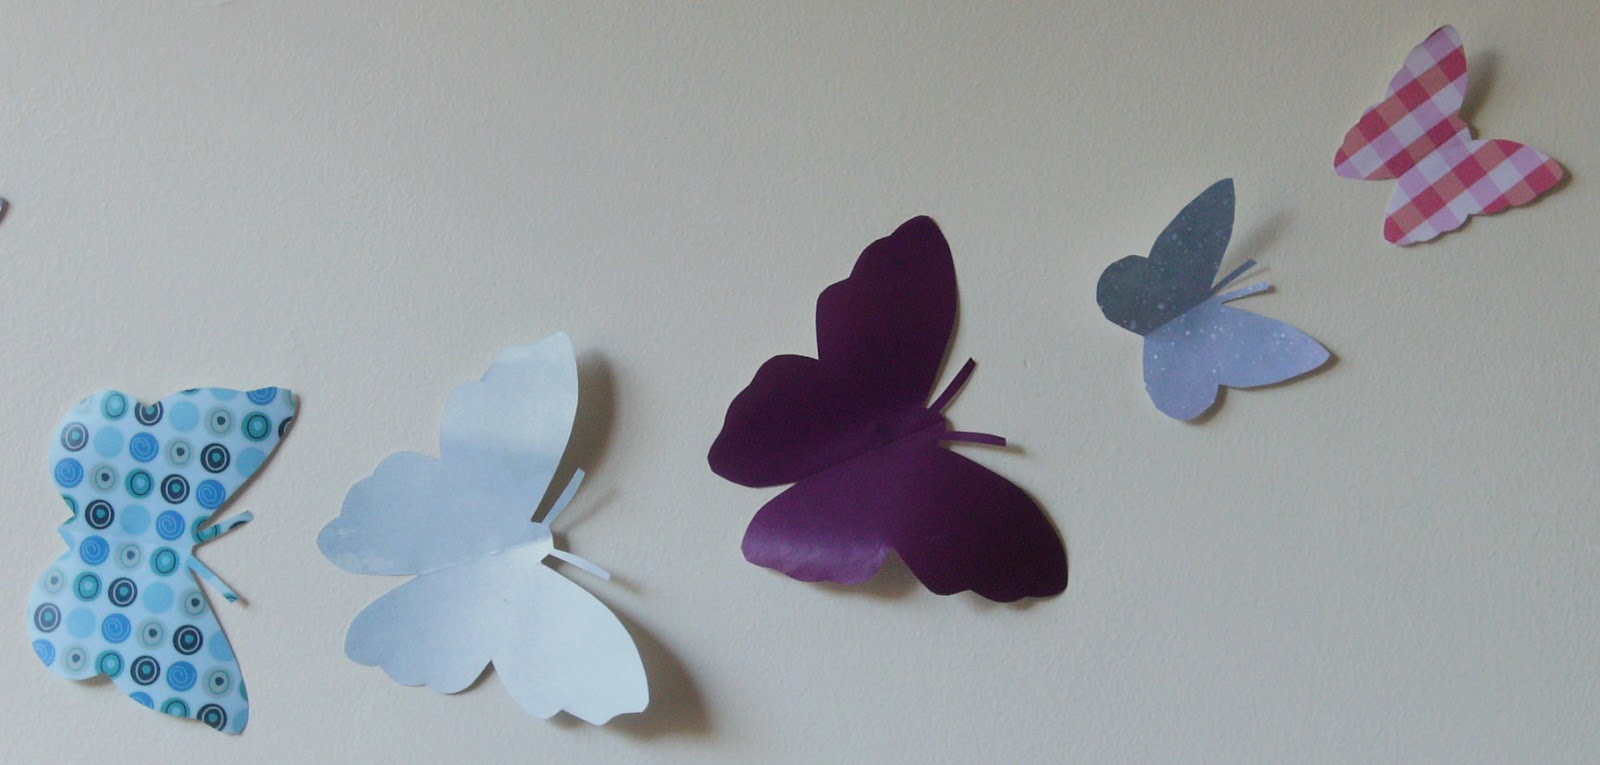
I found printed scrapbooking paper, card, coloured copy paper, 
wrapping paper, notepaper and origami paper.
 The  30cm x 30cm (12in x 12in) format scrapbooking paper and card were needed for the largest butterflies. You could use large sheets of card or art paper instead.

Next I collected some images to make templates for the butterflies.   Here are some of the links for the templates I used, but it is easy to find plenty more using a Google search (type in "butterfly image" or "butterfly printable").


I printed them in a range of sizes between a wing span of about 8cm to a wingspan of about 30cm (between about 3 and 123 inches).  Some of the images are given in multiple sizes.  Others I resized by choosing "scale printing" in my printers settings, then choosing different percentages for each printout.


Because a lot of butterflies were needed I made templates by gluing the printouts to scrap card (from a cereal box) and cutting them out.  The template only needs to be of half of each butterfly as they will all be cut on the fold.
 Next I folded paper and traced around the templates
Again and again.....

Note how the antennae have been drawn in freehand. This was much easier than cutting and tracing them as part of the template. I tried to squeeze in as many butterflies as possible into each piece of paper.

Next I cut and cut.....


I wasn't too precious about tracing and cutting precisely as the different butterflies don't need to be exactly identical. 

To make the Iarger butterflies I glued together several layers of cutouts.

I cut a body out of the same paper as the bottom layer to glue on the top of the other layers.
I only glued down the middle of each layer so that the edges would be able to lift up a little.
The smaller butterflies were made of only one layer.  Some of them ended up with antennae and some didn't..
Then came the fun bit.....
I took a packet of blu-tack and a pile of butterflies, climbed on a chair and started sticking them to the wall.
 I placed small pieces of blu-tack along the fold of each butterfly so that the wings are free to stand out from the wall and create a 3 dimensional effect.
The larger butterflies and ones cut from thinner paper need some extra blu-tack to hold their wings out, but I made sure that the wings were not flat to the wall and still arch a little.

It helped to put up the larger butterflies first then position the smaller ones between and spreading out from them.

In Isobel's room she imagined strong design lines that we placed the butterflies along.


It took a long time to put them all up but they make a great effect now that we have finished.

As time has passed, some of the butterflies have drooped a little, but the wings can be fixed back by adding tiny pieces of blu-tack to the tips.


Sunday, September 18, 2011

Butterflies


I decorated the wall above my bed with a flight* of butterflies.  When Isobel saw them she wanted to do the same in her room - but for her, we made it into a whole room experience......


We live in a rental property and I am nervous that even using removable hooks will damage the dodgy paint job.  If I hang one of my "real" art works they might be damaged when they hit the floor if the hook (or paint) fails.  But I hope a multitude of pieces of paper blu-tacked to the wall will not cause a hazard to either the paint, or to the person sleeping underneath if they fall off. 


In the next post I will show how we made some of these butterflies.

 
On Butterflies
What do you call a group of butterflies?  As an insect, a group would be called a swarm or rabble. Some research online also brings up the terms flight, kaleidoscope and flutter, all of which are delightfully descriptive, even if they may not be conventional entymological terms.

 
Butterflies to me are a symbol of new life and transformation.
 
"What the caterpillar calls the end of the world,
the Master calls the butterfly."
Richard Bach

"We delight in the beauty of the butterfly,
but rarely admit the changes it has gone 
through to achieve that beauty."
Ê Maya Angelou

Kids Craft with Bel - Tangram Folder

I made this folder for my maths sheets and decorated it with a tangram bear.


Instructions
1. Print out a tangram pattern on coloured cardboard.  You can use our template or find one using Google Images.
Right click on picture then save image.  Open file and print.

 2. Arrange the tangrams into a shape you like.  Here are some other examples.


3. Glue the tangram design onto a large piece of paper. Add details (eg.eyes) with texta.
4. Place the paper on top of another piece of paper. 
5. Staple the edges to make a folder as in the picture.
6. Enjoy.


Tuesday, September 6, 2011

Paint Chip Patchwork

I could spend hours in the hardware store almost hypnotised by the range of lovely coloured paint chips all in harmonious arrangements, stretching across a whole wall.  It seems there are quite a few people out there who share this madness, and have found many ways to produce artworks and crafts from them.  Just go to Pinterest or Google and do a search.  My Pinterest board can be found at http://pinterest.com/bluemeg/paint-chip-heaven/ but there are many out there.

Inspired by this paint chip mosaic here and some quilting designs, I made this:

I bounced around the web for some time tracing links and viewing versions of this project and I think the original tutorial is at hopestudios.blogspot.com - my apologies if I am wrong. I won't repeat the well written tutorials out there made but I will tell you what I learned from the experience.

I divided the board into 35 6cm squares.  Then I cut the chips into shapes with sides of multiples of 2cm. 


I arranged the shapes to make squares with 6cm sides.   I put a piece of clear plastic over the board (sorry no photo) and arranged the squares on top of the plastic, holding them in place with tiny lumps of blu-tack. Then I could slide the plastic aside and transfer the pieces one by one onto the board as they were glued.


I did not have any Modge Podge, which is expensive in Australia anyway, so I used a mixture of water and PVA in approximately 50/50 proportions which worked very well. (PVA is polyvinyl acetate, which is white wood glue that dries clear. I think it is the same as Elmers school glue in the US)  I used it to glue down the chips and numerous layers over the top as a finish. 


To adhere the chips to the board I painted on the mixture in sections and let it dry a bit so that it was more tacky before placing the chips on top.  Some chips that I put over wetter or too much glue curled upwards at the edges.  Spray adhesive would probably have been easier.

Note how some of the edges of the chips have lifted. There is also grit caught in the finish.  Both of these problems could have been avoided if I had been working in better light and had fixed them before it dried. It looks OK from a distance and I like a less than perfect arrangement. If I did it again, I would cut more of the patches slightly less accurately, and let some more slivers of background show through.
I painted the board underneath black all over and didn't apply any stain or colour over the top of the mosaic as the black showing through the gaps was enough for me.


Sunday, August 21, 2011

Tutorial: Cutting Easy Squares

I use quite a number of paper squares for some of my origami projects – boxes, envelopes, Christmas decorations, seed packets, seedling pots, flocks of birds, bunches of flowers ..... This is how I cut them easily and accurately, and most importantly quickly. It is especially good for recycling magazine pages which often have a raggedy edge and would otherwise involve measuring and fiddling.

Start with any piece of paper with at least one right angle and two straight sides.


Fold the right angled corner in half, lining up the two sides that had formed the right angle, precisely.  (In the example, fold the left hand side down to meet the bottom edge).

If a square with particular dimensions is desired, measure the desired side length from the folded point along the lined up straight edge. (In the example, measure along the bottom edge from the point at the left hand side)


Line up the matched edges with the bottom edge of a paper cutter, the grid lines of a cutting mat or one side of a t-square.  If a measurement was marked, line the mark up with the cutting line.  (In the example line the bottom edge of the paper against the bottom edge of the cutter)  CUT!


A perfect square to play with!